Inches on a Tape Measure: Measuring Skills for Everyone
Accurate measurement is fundamental in various fields, from construction and sewing to everyday household tasks. The inches on a tape measure play a pivotal role in ensuring precision and efficiency. Whether you’re a professional contractor, a home DIY enthusiast, or simply looking to perfect your craft, understanding the nuances of tape measure markings can significantly enhance your work quality. This article delves into multiple aspects of using inches on a tape measure, providing valuable tips and techniques to maximize its potential across different scenarios.
Contents
hide
 Fractional Marking Decoder: Reading 1/16 Increments Without Eyestrain
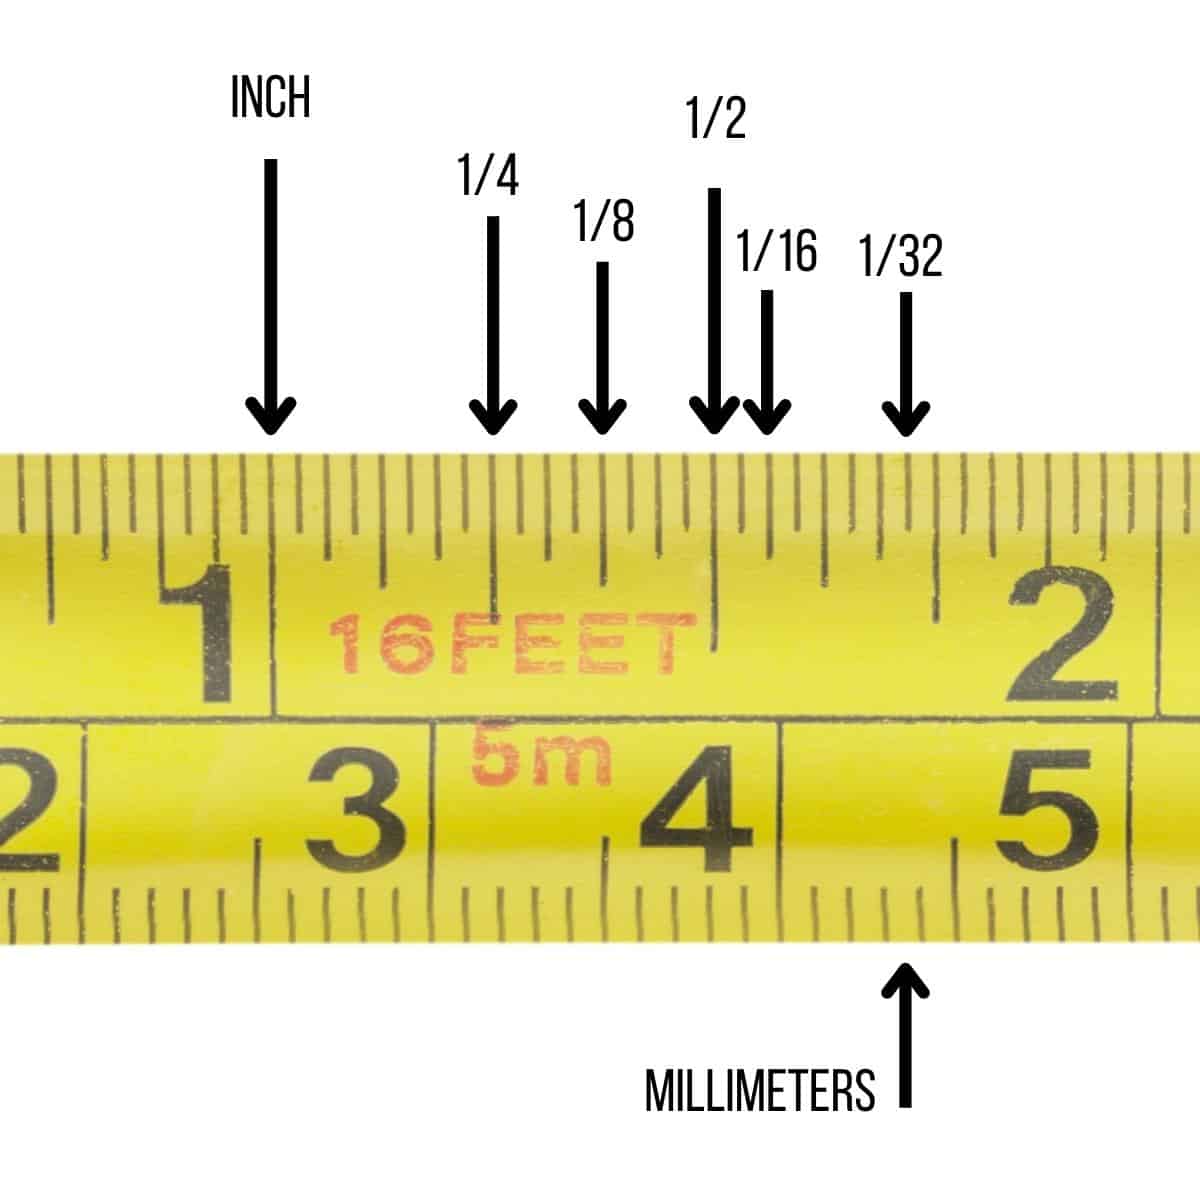
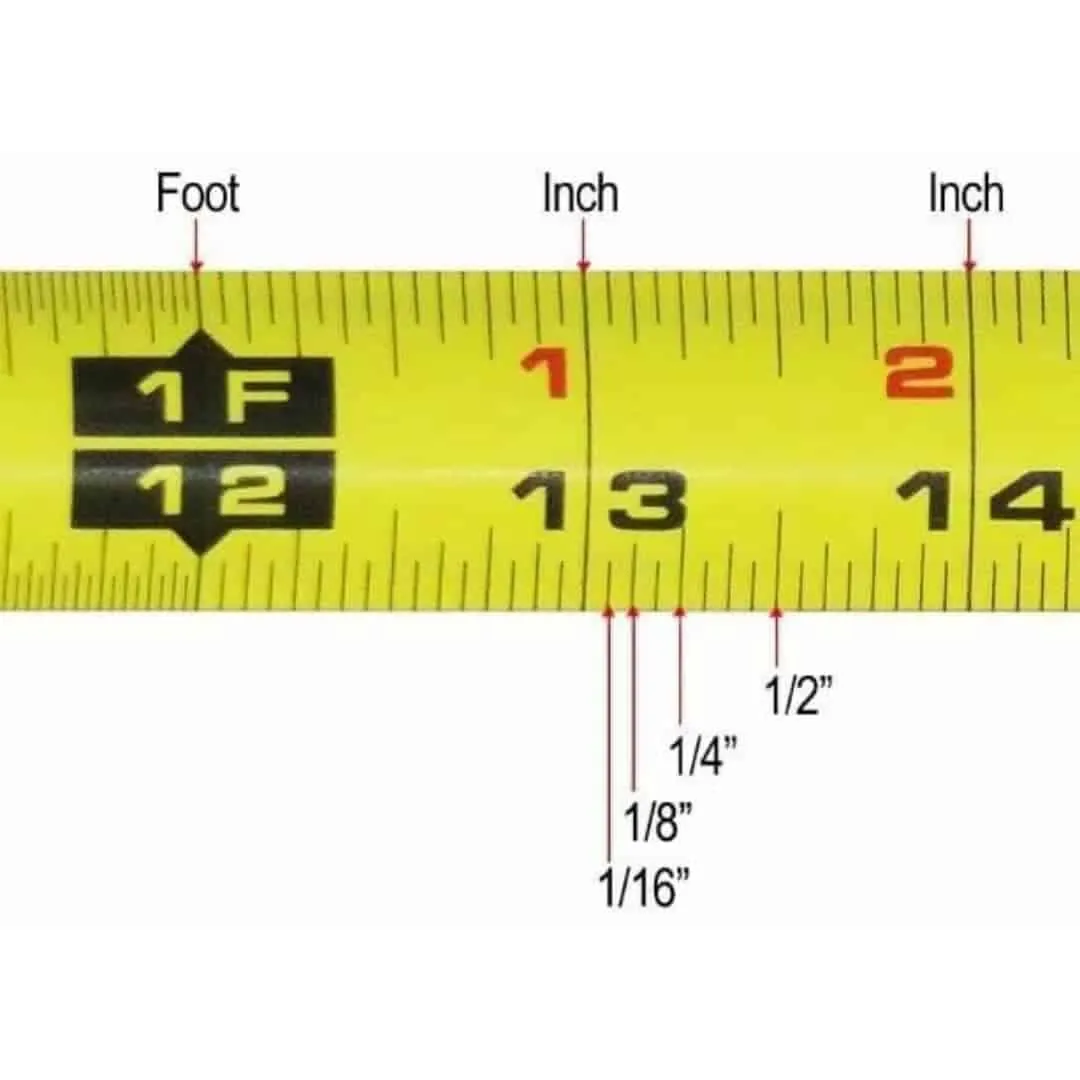
When using a tape measure, interpreting fractional markings accurately is crucial for precision. The inches on a tape measure are typically divided into smaller fractions, with 1/16 of an inch being a standard increment. However, reading these fine divisions can sometimes cause eyestrain and errors. To decode these fractional markings effortlessly, consider the following techniques.
Simplifying Fractional Readings
First and foremost, familiarize yourself with the common fractional divisions on your tape measure. Each inch is divided into halves (1/2″), quarters (1/4″), eighths (1/8″), and sixteenths (1/16″). By mentally grouping these fractions, you can quickly estimate measurements without focusing on the exact tiny marks. For instance, if you need to measure 3 and 7/16 inches, recognize that 7/16 is slightly less than half of the next inch, simplifying the reading process.
Utilizing Visual Aids
Additionally, using visual aids like color-coded markers or high-contrast markings can help distinguish between different fractional increments. Many modern tape measures come with enhanced markings or even glow-in-the-dark features that make it easier to identify precise measurements in various lighting conditions. By incorporating these visual tools, you reduce the likelihood of misreading and minimize eyestrain during prolonged use.
 Body Measurement Hacks: Accurate Bust/Waist Tracking for Home Sewing
For home sewers, accurate body measurements are essential to ensure garments fit perfectly. The inches on a tape measure are integral in tracking bust and waist sizes, allowing for precise tailoring and adjustments.
Consistent Measurement Techniques
To achieve consistent results, always measure the same part of your body at the same time of day. This practice accounts for any natural body fluctuations and ensures that your measurements remain accurate over time. For bust measurements, wrap the tape measure around the fullest part of your chest, keeping it parallel to the floor. Similarly, for waist measurements, position the tape measure around the narrowest part of your torso. By adhering to these consistent techniques, the inches on a tape measure become a reliable tool for tracking and adjusting your sewing projects.
Recording and Analyzing Data
Moreover, maintaining a detailed record of your measurements can help in identifying patterns and necessary adjustments. Use a notebook or a digital app to log your measurements regularly. This data-driven approach allows you to make informed decisions when selecting patterns, sizing fabrics, and executing alterations. Ultimately, mastering the use of inches on a tape measure enhances your sewing accuracy and the overall quality of your garments.
Furniture Fit Guarantee: Avoiding IKEA Disasters with Wall Gap Calculations
When furnishing a space, precise measurements ensure that each piece fits seamlessly without causing chaos or clutter. The inches on a tape measure are indispensable for calculating wall gaps and furniture dimensions, preventing the common pitfalls associated with mass-produced furniture like those from IKEA.
Measuring Wall Spaces Accurately
Start by measuring the available wall space where you intend to place furniture. Use the tape measure to determine the height, width, and depth of the area. This information is crucial when selecting furniture pieces that complement your room’s layout. For example, a standard sofa may require specific wall gaps to ensure easy placement and access. By accurately measuring these dimensions, you can avoid purchasing furniture that doesn’t fit, saving time and reducing frustration.
Planning Furniture Layouts
Furthermore, planning your furniture layout beforehand can optimize space utilization. Sketch a floor plan and use the inches on a tape measure to mark the exact positions for each piece. This method helps visualize the final arrangement and make necessary adjustments without the need for physical trial and error. Consequently, you prevent the common IKEA disaster of having oversized furniture that disrupts the room’s harmony.
 Pet Sizing Solutions: Collar and Harness Measuring Tricks for Wiggly Pets
Ensuring that your pets are comfortable and safe involves precise measurements for collars and harnesses. The inches on a tape measure provide the accuracy needed to select the right sizes for your lively and wiggly companions.
Safe and Comfortable Fit
Begin by measuring your pet’s neck for collars. Wrap the tape measure snugly around the base of their neck, leaving enough room to fit two fingers between the tape and their skin. This allowance ensures that the collar is neither too tight nor too loose, promoting comfort and preventing accidental escapes. For harnesses, measure the chest and girth, following the manufacturer’s guidelines to select the appropriate size based on the inches on a tape measure.
Adapting to Pet Growth
Additionally, regularly updating your pet’s measurements is essential, especially for growing puppies or active cats. By using the inches on a tape measure to track any changes, you can adjust or replace collars and harnesses as needed, ensuring ongoing safety and comfort. These accurate sizing solutions help maintain your pet’s well-being and enhance your bonding experience.
Curve Measurement Mastery: Calculating Fabric Yardage for Circular Skirts
Sewing circular garments, such as skirts, demands precise calculations to ensure ample fabric usage. The inches on a tape measure are fundamental in determining the exact yardage needed, facilitating seamless and error-free sewing projects.
Understanding Circumference Calculations
To calculate the fabric required for a circular skirt, first measure the waist circumference using the tape measure. Next, determine the desired skirt length by measuring from the waist to the hem. By converting these inches into yardage, you can estimate the total amount of fabric needed. For instance, a waist circumference of 30 inches and a skirt length of 40 inches would require careful calculation to ensure the fabric overlaps correctly, avoiding shortages or excess.
Planning Fabric Layout
Moreover, planning the fabric layout on your sewing table helps optimize usage and reduce waste. Lay out the fabric and use the inches on a tape measure to mark precise cutting lines based on your calculations. This strategic approach not only saves time but also enhances the quality of your final product by ensuring consistent measurements throughout the sewing process.
Picture Hanging Perfection: Nail Spacing Formulas for Gallery Walls
Creating an aesthetically pleasing gallery wall involves meticulous planning, particularly in nail spacing and picture alignment. The inches on a tape measure play a crucial role in achieving perfect symmetry and balance in your display.
Calculating Optimal Nail Spacing
Start by determining the overall layout of your gallery wall. Measure the spacing between each picture frame using the tape measure to maintain uniformity. For example, a common spacing might be 2 inches between each frame. By consistently applying this measurement, you ensure that your gallery wall appears organized and visually appealing, avoiding the haphazard look of unevenly spaced frames.
Aligning Frames with Precision
Additionally, use the inches on a tape measure to align your frames accurately both horizontally and vertically. Mark precise points on the wall where nails should be placed, using the tape measure to ensure each frame aligns perfectly with the others. This method facilitates a professional and polished appearance, transforming a simple wall into a captivating gallery display that reflects your personal style.
 Growth Tracking Innovations: DIY Height Chart Accuracy Checks
Tracking growth, especially for children, requires accurate and reliable measurements. The inches on a tape measure are essential for creating DIY height charts that monitor height progression over time.
Creating a Durable Height Chart
Begin by selecting a prominent wall space and using the tape measure to mark consistent inch intervals. Apply these marks horizontally, ensuring they are level and evenly spaced. By doing so, you create a durable and precise height chart that can withstand regular use and accurately reflect growth changes.
Regular Measurement and Recording
Furthermore, schedule regular measurement sessions, such as monthly or quarterly, to track growth accurately. Use the inches on a tape measure to record each growth milestone, and update your chart accordingly. This consistent approach provides a clear visual representation of growth patterns, helping parents and caregivers make informed decisions about health and development.
Accessible Measuring Tech: High-Contrast Tapes for Aging Eyes
As we age, visual acuity can decline, making it challenging to read standard tape measure markings. The inches on a tape measure are made more accessible through high-contrast designs that cater to aging eyes, ensuring continued precision and ease of use.
Enhanced Visibility Features
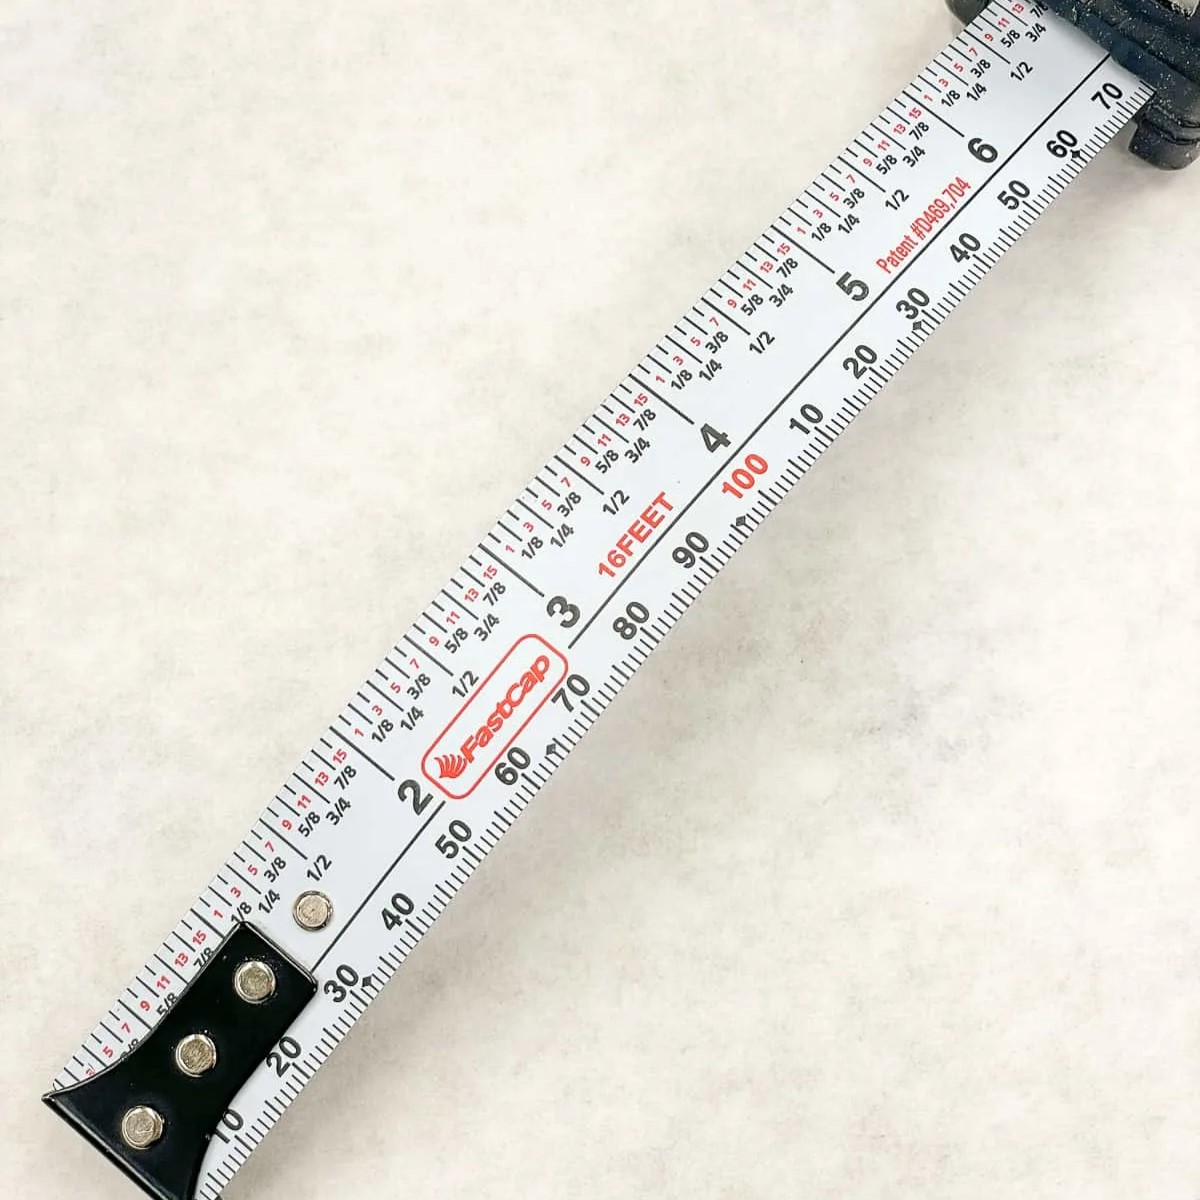
Opt for tape measures with high-contrast markings, such as bold black numbers on a bright yellow background. These designs improve readability, reducing eye strain and making it easier to distinguish between inches and their fractional divisions. Additionally, some tape measures incorporate large numerals or reflective surfaces that enhance visibility in low-light conditions, further aiding users with diminished eyesight.
Incorporating Assistive Tools
Moreover, consider using magnifying aids or ergonomic tape measure holders that help position the tape securely and comfortably. These assistive tools complement high-contrast tapes, providing a comprehensive solution for individuals with aging eyes. By leveraging these accessible measuring technologies, you can maintain accuracy and efficiency in your measurement tasks without compromising on comfort or ease of use.
Conclusion: Enhancing Precision and Versatility with Inches on a Tape Measure
In conclusion, the inches on a tape measure are more than just numerical indicators; they are the foundation of accuracy and efficiency across a myriad of applications. From decoding fractional markings and tracking body measurements to ensuring furniture fits perfectly and creating aesthetically pleasing gallery walls, the versatility of inches on a tape measure cannot be overstated. By mastering the techniques and utilizing the innovative features discussed in this article, you can elevate your measurement skills and achieve professional-grade results in all your projects. Embrace the precision and reliability that inches on a tape measure offer, and transform the way you measure, create, and organize your world.