3/16 on a Tape Measure: A Guide to Accurate Measurements
When it comes to precision in measurements, every fraction counts, especially in intricate projects. The 3/16 on a tape measure plays a crucial role in ensuring accuracy across various tasks, from woodworking and crafts to engineering and jewelry making. Understanding how to effectively use this specific measurement can significantly enhance the quality and precision of your work. In this comprehensive guide, we will delve into the importance of the 3/16-inch mark on a tape measure, explore its practical applications, discuss conversion techniques, identify common measurement errors, and highlight tools and techniques to improve accuracy.
Contents
hide
 Precision in Small-Scale Measurements
Precision is paramount when working on projects that require meticulous attention to detail. The 3/16 on a tape measure is particularly useful in small-scale measurements where even minor discrepancies can lead to significant issues. For instance, in jewelry making, a 3/16-inch measurement might determine the fit of a gemstone or the spacing of decorative elements. Similarly, in model building, this fraction ensures that components align perfectly, maintaining the structural integrity and aesthetic appeal of the model.
Understanding the 3/16 Inch Mark
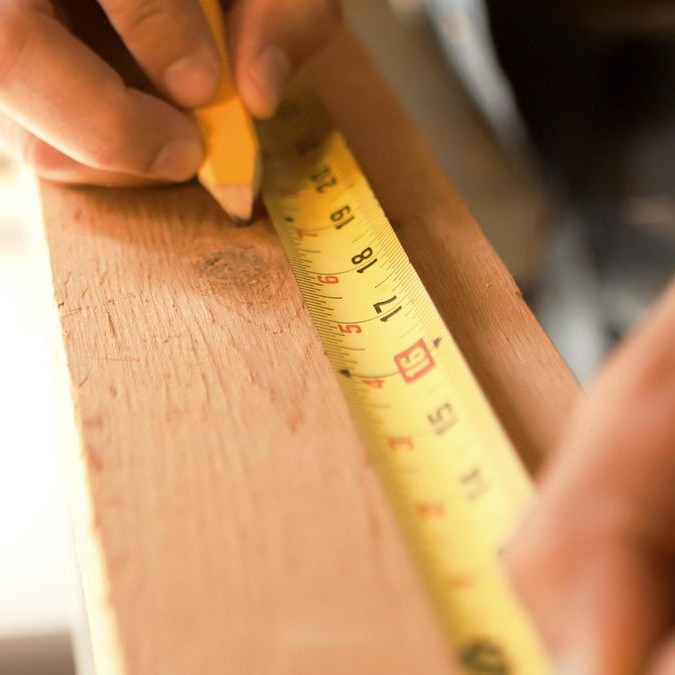
The 3/16-inch mark is one of the smaller increments on a standard tape measure, positioned between the 1/8-inch and the 1/4-inch marks. While it may seem insignificant compared to larger measurements, its role in achieving precise measurements cannot be overstated. Accurately reading this mark requires careful attention and practice, especially when working on tasks that demand high precision.
Applications in Various Fields
The versatility of the 3/16-inch measurement extends to numerous fields. In woodworking, for example, it is often used to measure the thickness of materials or the width of grooves and joints. In crafting, it can determine the size of embellishments or the spacing between decorative elements. Additionally, in engineering and mechanical work, the 3/16 mark ensures that components fit together seamlessly, preventing potential malfunctions or structural weaknesses.
Practical Applications in Woodworking and Crafts
Woodworking and crafting are areas where precision is crucial. The 3/16 on a tape measure aids artisans in achieving the exact measurements needed for their projects, ensuring that each piece fits together seamlessly and functions as intended.
Cutting Thin Materials
When working with thin wood boards or delicate materials, the 3/16-inch measurement is essential for accurate cuts. For example, when molding trim or crafting fine details, measuring precisely prevents waste and ensures that pieces fit together without gaps or overlaps. This level of precision is particularly important when assembling intricate designs or working with limited material sizes.
Creating Joints and Connections
In woodworking, the strength and stability of joints are fundamental. The 3/16-inch mark can be used to measure the width of dovetail joints, mortise and tenon connections, or other intricate fittings. By ensuring that each joint is measured accurately, craftsmen can create strong, reliable connections that enhance the overall durability and appearance of the finished product.
Enhancing Decorative Details
Crafts often involve adding decorative elements that require precise measurements. Whether it’s engraving, carving, or attaching small embellishments, the 3/16-inch mark helps ensure that these details are uniformly sized and spaced. This consistency not only improves the aesthetic quality of the work but also contributes to the overall professionalism of the craftsmanship.
 Fractions to Decimals and Metric Equivalents
Accurate measurement often requires converting between different units. Understanding how to convert 3/16 on a tape measure from fractions to decimals and metric units is essential, especially in projects that involve multiple measurement systems.
Converting Fractions to Decimals
To convert 3/16 inches to a decimal, divide the numerator by the denominator:
3÷16=0.1875 inchesThis conversion is useful for calculations that require decimal precision, such as when programming CNC machines or integrating measurements into digital design software.
Converting to Metric Units
For those working in metric-based systems, converting 3/16 inches to millimeters is often necessary. The conversion factor is:
3/16 inch×25.4 mm/inch=4.7625 mmRounding to a practical measurement for most applications, 3/16 inches is approximately 4.76 millimeters. This conversion is particularly useful in international projects or when collaborating with teams that use the metric system.
Practical Conversion Examples
Suppose you are working on a project that requires a component to be 3/16 inches thick. If your design software requires metric units, you will need to input 4.76 millimeters to achieve the same precision. Similarly, if you are following an international blueprint that uses millimeters, converting 4.76 mm back to 3/16 inches ensures that your measurements align correctly with the design specifications.
Common Errors and How to Avoid Them
Even with a precise tool like a tape measure, errors can occur, especially when reading smaller fractions like 3/16 inches. Understanding common mistakes and how to avoid them is crucial for maintaining measurement accuracy.
Misreading the Scale
One of the most frequent errors is misreading the tape measure scale. The 3/16-inch mark is close to the 1/4-inch mark, making it easy to confuse the two. To prevent this, take your time when measuring and ensure that you are correctly identifying the 3/16-inch increment.
Incorrect Tape Placement
Another common mistake is placing the tape measure incorrectly. If the tape is not aligned properly with the starting point or is not held taut, the measurement can be inaccurate. Always double-check that the tape is straight and firmly positioned before taking your measurement.
Inconsistent Measuring Techniques
Inconsistent measuring techniques, such as varying the angle at which the tape is held, can lead to errors. To maintain accuracy, hold the tape measure perpendicular to the surface being measured and keep it steady throughout the measurement process.
Parallax Error
Parallax error occurs when the measuring mark is viewed from an angle rather than directly. This can cause the 3/16-inch mark to appear slightly off. To avoid parallax error, position yourself directly in line with the tape measure mark when reading the measurement.
 Tools and Techniques for Enhanced Accuracy
Achieving high accuracy with the 3/16-inch measurement requires not only careful reading but also the right tools and techniques. Here are some strategies to enhance your measurement precision.
Using a Magnifying Glass
A magnifying glass can help you see the 3/16-inch mark more clearly, reducing the likelihood of misreading the scale. This is particularly useful when working on small or detailed projects where precision is essential.
Employing a Square or Straightedge
Using a square or straightedge in conjunction with your tape measure ensures that your measurements are aligned correctly. This helps maintain consistent angles and straight lines, which is critical for maintaining overall accuracy in your work.
Practicing Consistent Measurement Techniques
Developing a consistent measurement technique is key to achieving reliable results. Always measure from the same starting point, hold the tape measure steady, and view the measurement mark from the same angle to minimize variability.
Utilizing Measuring Aids
There are various measuring aids available that can help improve precision. For example, some tape measures come with built-in magnifiers or better-marked scales that make reading smaller increments like 3/16 inches easier. Additionally, using clamps or fixtures can hold the tape measure in place, preventing movement that could lead to inaccurate readings.
Regular Calibration of Tools
Regularly calibrating your tape measure ensures that it remains accurate over time. Wear and tear can cause tape measures to stretch or the markings to fade, leading to potential measurement errors. Periodically check the accuracy of your tape measure against known standards to maintain its reliability.
 Practical Tips for Accurately Reading 3/16 on a Tape Measure
Beyond the tools and techniques, adopting specific practices can further enhance your ability to measure accurately with the 3/16-inch mark.
Marking Measurements Immediately
Once you have measured 3/16 inches, mark the spot immediately. This reduces the risk of forgetting the measurement or accidentally moving the tape. Using a pencil or a piece of masking tape to make a temporary mark can be helpful.
Double-Checking Measurements
Always double-check your measurements to ensure accuracy. Measuring the same dimension more than once minimizes the chance of errors and confirms that you have the correct measurement.
Familiarizing Yourself with the Scale
Spend time familiarizing yourself with the tape measure’s scale. The more comfortable you are with the layout of the markings, the quicker and more accurately you can read specific measurements like 3/16 inches.
Using Reference Points
Leveraging reference points, such as existing edges or marks, can help you align your measurements more accurately. This is particularly useful when transferring measurements from a plan to the material.
Keeping the Tape Measure Clean and Clear
Ensure that the tape measure is free from dirt, debris, or damage that could obscure the markings. A clean, well-maintained tape measure provides clearer, more accurate readings.
Advanced Techniques for Professionals Using
For professionals who require the highest level of precision, advanced techniques can further enhance the accuracy of measurements taken with the 3/16-inch mark.
Utilizing Digital Tape Measures
Digital tape measures offer electronic readouts that can display measurements in both fractions and decimals, reducing the potential for misreading small increments like 3/16 inches. These devices often come with additional features, such as memory storage and switching between units, which can streamline the measurement process.
Incorporating Laser Measuring Tools
Laser measuring tools provide precise measurements without the need for physical contact. While typically used for larger measurements, they can also be helpful for verifying smaller measurements like 3/16 inches by ensuring that the laser is accurately aligned with your tape measure.
Implementing Calibration Standards
Industrial calibration standards can be used to verify and adjust the accuracy of your tape measure. This is particularly important in professional settings where measurement precision is critical, such as in manufacturing or engineering.
Training and Skill Development
Continual training and skill development are essential for professionals who frequently use the 3/16-inch mark. Workshops, courses, and hands-on practice can enhance your measurement techniques and ensure that you remain proficient in reading and utilizing small increments accurately.
Conclusion
In conclusion, the 3/16 on a tape measure is more than just a small fraction; it is a vital component in achieving precision across a wide range of tasks. Whether you are a woodworking enthusiast, a craftsman, an engineer, or a jeweler, mastering the use of this specific measurement can significantly enhance the accuracy and quality of your work. By understanding its importance, applying practical measurement techniques, converting units accurately, avoiding common errors, and utilizing the right tools, you can ensure that your projects meet the highest standards of precision. Embrace the precision of 3/16 inches and elevate your craftsmanship to new heights.