1/8 on a Tape Measure: A Guide to Accurate Measurements
When it comes to precision in any project, whether you’re a seasoned professional or a passionate DIY enthusiast, understanding the 1/8 on a tape measure is crucial. This seemingly small fractional measurement plays a significant role in ensuring accuracy across various tasks, from woodworking and sewing to home improvement and crafting. In this comprehensive guide, we will explore the ins and outs of using the 1/8-inch mark on a tape measure, offering practical tips, conversion techniques, and strategies to avoid common mistakes. By mastering this measurement, you can enhance the quality and efficiency of your projects, ensuring flawless results every time.
Contents
hide
 The Importance of the 1/8 Inch Mark on a Tape Measure
Understanding Fractional Measurements
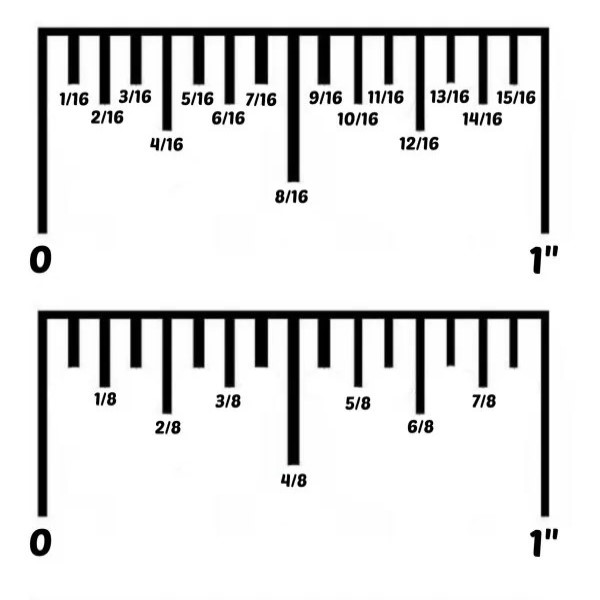
Tape measures are indispensable tools in any workshop or craft room, featuring a multitude of markings that represent different measurements. Among these, the 1/8 on a tape measure is a key fractional inch that often dictates the precision of your work. Knowing how to accurately read and utilize this mark can make a significant difference in the outcome of your projects. Whether you’re cutting wood, sewing fabric, or measuring for home improvements, the 1/8-inch increment provides the necessary detail to achieve exact results.
Enhancing Precision in Various Applications
Precision is paramount in many disciplines. For instance, in woodworking, even a slight mismeasurement can result in imperfect joints or unstable structures. Similarly, in sewing, a small error can affect the fit and appearance of garments. The 1/8-inch mark helps mitigate these risks by allowing for more refined measurements. By incorporating this fractional measurement into your workflow, you can ensure that every cut, stitch, and installation is executed with meticulous accuracy.
Practical Uses of 1/8 on a Tape Measure
Woodworking: Creating Perfect Joints
In woodworking, precision is the key to creating strong and aesthetically pleasing joints. The 1/8 on a tape measure is frequently used to measure the thickness of materials, ensuring that each piece fits together seamlessly. For example, when crafting a dovetail joint, the 1/8-inch mark can help align the tails and pins accurately, resulting in a tight and durable connection.
Measuring and Marking Wood
To achieve accurate measurements, start by anchoring your tape measure at the edge of the wood. Carefully note the 1/8-inch mark and use a pencil to make a precise mark. This practice facilitates clean cuts and uniform spacing, essential for projects like shelving, cabinetry, and furniture making. Additionally, consistent use of the 1/8-inch measurement helps maintain the overall integrity and stability of the finished piece.
Sewing and Upholstery: Achieving Flawless Stitches
In the realm of sewing and upholstery, precision in measurement translates to professional-grade results. The 1/8 on a tape measure is pivotal for tasks such as marking seam allowances, spacing buttons, and ensuring consistent padding thickness. Accurate measurements ensure that garments fit perfectly and upholstered items are both comfortable and visually appealing.
Precision in Fabric Cutting
When cutting fabric, use the 1/8-inch mark to establish precise seam lines. Align your tape measure with the fabric edge and mark the 1/8-inch increment to guide your cuts. This technique prevents fabric wastage and ensures that seams are even and straight. For intricate designs, such as embroidery or applique, the 1/8-inch measurement helps in positioning patterns accurately, contributing to the overall quality of the finished product.
Home Improvement: Ensuring Accurate Installations
Home improvement projects, such as installing cabinets, fitting tiles, or mounting fixtures, require exact measurements to ensure proper fit and finish. The 1/8 on a tape measure provides the necessary precision to tackle these tasks confidently. Accurate measurements prevent gaps, misalignments, and material excess, resulting in a polished and professional appearance.
Cabinet and Fixture Installation
When installing cabinets or other fixtures, use the 1/8-inch mark to measure and align each piece. This level of precision ensures that doors and drawers open smoothly and that the overall structure is level and secure. Additionally, the 1/8-inch increment helps in adjusting for minor discrepancies, allowing for adjustments that enhance the stability and functionality of the installation.
 Conversion Techniques: From Inches to Millimeters
Fractional to Decimal Conversion
Understanding how to convert fractional inches to decimal and metric units is essential for projects that involve different measurement systems. The 1/8 on a tape measure converts to 0.125 inches in decimal form. This conversion is particularly useful when working with digital tools or software that require decimal inputs, ensuring seamless integration of measurements across various platforms.
Fractional to Millimeter Conversion
To convert 1/8-inch into millimeters, multiply the decimal value by 25.4 (since one inch equals 25.4 millimeters).
0.125×25.4=3.175 mmThus, 1/8-inch is equal to approximately 3.175 millimeters. This precise conversion is beneficial in projects that demand metric measurements, such as international manufacturing or specialized crafting, ensuring compatibility and accuracy across different measurement systems.
Practical Conversion Tips
To streamline the conversion process, keep a small reference chart handy or use a calculator for quick translations. Additionally, memorizing common fractional to decimal and millimeter equivalents can enhance your measuring efficiency, reducing the time spent on calculations and increasing your productivity.
Common Mistakes and How to Avoid Them
Misreading the Tape Measure
One common error is misreading the fractional marks on a tape measure. The 1/8 on a tape measure can be easily confused with adjacent marks, especially if the tape measure is worn or dirty. To avoid this, take your time to carefully identify the correct 1/8-inch mark and distinguish it from nearby increments. Using magnifying glasses or better-lit workspaces can also enhance visibility and accuracy.
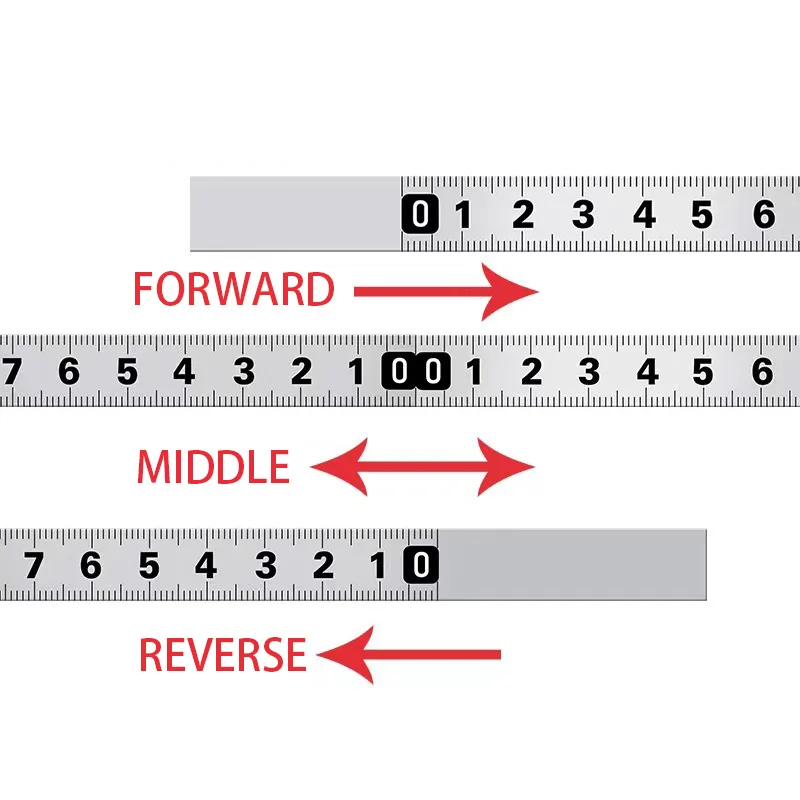
Incorrect Tape Alignment
Improper alignment of the tape measure can lead to skewed measurements. Ensure that the tape is firmly anchored at the starting point and remains straight and taut while measuring. Misalignment can distort the 1/8-inch measurement, causing issues like uneven cuts or misfitting components. Always verify that the tape measure is aligned correctly before making any markings or cuts.
Not Accounting for Tape Flexibility
Tape measures can sometimes flex, especially when measuring longer distances or applying pressure unevenly. Flexing can distort the 1/8-inch mark, leading to inaccurate measurements. To prevent this, hold the tape measure firmly and ensure it remains straight and tight throughout the measurement process. If necessary, use a helper to stabilize the tape measure for more precise readings.
Skipping Double-Checking Measurements
Another frequent mistake is not double-checking measurements. Even with careful measuring, errors can occur. Always verify your measurements by measuring twice, particularly before making critical cuts or assemblies. This practice ensures that any potential mistakes are caught early, maintaining the accuracy and quality of your project.
Advanced Techniques for Maximizing the 1/8 Inch Mark
Utilizing Templates and Guides
For projects that require repetitive use of the 1/8-inch measurement, creating templates or guides can enhance precision and efficiency. Templates act as consistent markers, allowing you to replicate measurements accurately across multiple components. This technique is especially useful in woodworking and sewing, where uniformity is essential for a polished finish.
Incorporating Digital Tools
Leveraging technology can further improve your measuring accuracy. Digital tape measures and measurement apps often come with built-in conversion features, allowing you to switch seamlessly between different measurement systems. These tools can complement your traditional tape measure cheat sheet, providing instant conversions and reducing the likelihood of manual calculation errors.
Multi-Stage Measurement and Verification
Implement a multi-stage measurement system where you measure, mark, and verify the 1/8-inch measurement at each step. This approach ensures that any discrepancies are identified and corrected early, maintaining the integrity of the measurement throughout the project. For instance, in woodworking, measure the length, mark the 1/8-inch increment, and then verify the measurement before making a cut.
Using Precision Tools
Incorporate precision tools such as fine-point pencils, measuring gauges, and laser guides to enhance the accuracy of the 1/8-inch measurement. These tools provide clearer marks and help maintain consistency, making it easier to follow through with exact measurements during cutting and assembly.
Practical Applications Across Different Domains
Woodworking and Carpentry
In woodworking and carpentry, the 1/8 on a tape measure is frequently used for measuring wood dimensions, creating precise joints, and ensuring uniform spacing. For example, when building a bookshelf, using the 1/8-inch mark ensures that each shelf is evenly spaced and securely attached to the frame. Additionally, when crafting furniture, precise measurements prevent gaps and misalignments, resulting in sturdy and aesthetically pleasing pieces.
Creating Dovetail Joints
Dovetail joints are prized for their strength and beauty in woodworking. The 1/8-inch measurement is essential for accurately measuring and marking the tails and pins, ensuring that each piece fits together snugly. This precision enhances the overall durability and appearance of the joint, making it a key skill for any woodworker.
Sewing and Upholstery
In sewing and upholstery, precise measurements are critical for achieving professional results. The 1/8 on a tape measure is used for tasks such as spacing buttons, measuring seam allowances, and ensuring consistent padding thickness. Accurate measurements lead to well-fitted garments and durable upholstery, enhancing both functionality and aesthetics.
Spacing Buttons Evenly
When spacing buttons on a garment, the 1/8-inch mark helps maintain uniform distance between each button. This consistency not only improves the garment’s appearance but also ensures that the buttons function correctly, providing a balanced and aesthetically pleasing look.
Home Improvement and Renovation
Home improvement projects demand precise measurements to ensure that installations fit correctly and function as intended. The 1/8 on a tape measure is invaluable for tasks such as fitting tiles, installing cabinetry, and mounting fixtures. Accurate measurements prevent gaps, misalignments, and material waste, leading to a professional and polished finish.
Tile Installation
When laying tiles, using the 1/8-inch mark helps maintain even spacing between tiles, ensuring a uniform and attractive appearance. Consistent measurements also facilitate grout application and prevent tiles from shifting or becoming misaligned over time.
Crafting and Hobbies
In various crafting and hobby projects, the 1/8 on a tape measure plays a crucial role in maintaining precise measurements and achieving consistent results. Whether you’re making handmade jewelry, constructing model structures, or engaging in intricate paper crafts, accurate measurements enhance the quality and durability of your work.
Jewelry Making
In jewelry making, the 1/8-inch measurement is used for spacing beads, measuring wire lengths, and ensuring consistent sizing of components. Precise measurements ensure that each piece of jewelry is uniform and well-finished, meeting high standards of craftsmanship.
 Conversion Guide: From Inches to Millimeters and Decimals
Fractional to Decimal Conversion
Converting fractional inches to decimal form is straightforward. The 1/8 on a tape measure equals 0.125 inches in decimal. This conversion is particularly useful when working with digital tools or software that require decimal inputs, ensuring accuracy and consistency in your measurements.
Fractional to Millimeter Conversion
To convert 1/8-inch to millimeters, multiply the decimal value by 25.4 (since one inch equals 25.4 millimeters):
0.125×25.4=3.175 mmTherefore, 1/8-inch is equal to approximately 3.175 millimeters. This precise conversion is essential for projects involving metric measurements, allowing for seamless integration of different measurement systems.
Practical Conversion Tips
To simplify conversions, keep a small reference chart or calculator handy. Additionally, memorizing common fractional to decimal and millimeter equivalents can enhance your measuring efficiency, reducing the time spent on calculations and increasing productivity.
Example Conversion Chart
| Fractional Inch | Decimal Inch | Millimeters |
|---|---|---|
| 1/8 | 0.125 | 3.175 |
This simple chart can be a quick reference tool, aiding in swift and accurate conversions during your projects.
Avoiding Common Measurement Errors
Misreading the Tape Measure
Misreading the fractional marks is a common mistake. Ensure that you carefully identify the 1/8-inch mark and differentiate it from adjacent increments. Taking time to verify the correct measurement can prevent errors that compromise the quality of your work.
Incorrect Tape Alignment
Improper alignment of the tape measure relative to the material being measured can lead to skewed measurements. Always ensure that the tape is flat against the material and that the starting point is exact. This practice helps maintain the accuracy of the 1/8-inch measurement.
Neglecting Tape Flatness
Allowing the tape measure to bow or flex can distort measurements. Hold the tape firmly and ensure it remains straight and flat against the material to prevent inaccuracies. Using a helper or securing the tape measure with clamps can enhance stability and precision.
Double-Checking Measurements
Skipping the step of double-checking measurements can result in costly mistakes. Always verify your measurements by measuring twice, especially before making critical cuts or assemblies. This habit minimizes errors and ensures the accuracy of your project.
 Tips for Ensuring Accurate Measurements
Use Quality Tools
Investing in a high-quality tape measure ensures that the markings, including the 1/8-inch mark, are clear and durable. A reliable tape measure maintains its accuracy over time, providing consistent measurements across various projects.
Maintain Your Tape Measure
Regularly inspect your tape measure for wear and tear. Replace it if the markings become faded or if the tape itself is damaged. A well-maintained tape measure ensures that the 1/8-inch mark remains visible and accurate, supporting precise measurements.
Create a Measurement Routine
Developing a consistent measurement routine can enhance accuracy and efficiency. Always start by anchoring the tape measure correctly, reading the measurement at eye level, and keeping the tape straight and taut throughout the process. This routine helps build good measurement habits and reduces the likelihood of errors.
Utilize Measurement Aids
Incorporate measurement aids such as squares, levels, and marking gauges to improve the accuracy of your measurements. These tools provide additional reference points, enhancing the precision of the 1/8-inch measurement and contributing to the overall quality of your work.
Advanced Techniques for Precision
Leveraging Geometry for Complex Measurements
For projects involving complex shapes and angles, leveraging geometric principles can enhance measurement accuracy. Utilize the Pythagorean theorem and other geometric formulas found on your tape measure cheat sheet to calculate diagonal lengths and critical dimensions precisely.
Applying the Pythagorean Theorem
When constructing right-angled structures, use the Pythagorean theorem to determine the length of the hypotenuse. For example, if you need to measure the diagonal of a rectangle with sides measuring 3 feet and 4 feet, apply the formula:
32 + 4² = 9 + 16 = 25
√25 = 5 feet
This calculation ensures that your diagonal measurements are accurate, contributing to the overall stability and symmetry of your project.
Utilizing Digital Tools and Apps
Digital tape measures and measurement apps offer additional features that complement your traditional tape measure. These tools often include built-in conversion functions, digital displays, and even laser guides that enhance measurement precision. Integrating these digital solutions into your workflow can streamline your measuring process and reduce the potential for manual calculation errors.
Creating Custom Templates
For projects that require repetitive measurements, creating custom templates can save time and improve consistency. Templates act as guides, allowing you to replicate measurements accurately without constantly referring back to the tape measure. This technique is particularly useful in woodworking and sewing, where uniformity is essential for a polished finish.
Understanding Measurement Symbols
Some tape measures come with specialized symbols and markings beyond standard fractional inches and metric units. Understanding these advanced measurement symbols can broaden your measuring capabilities, making your tape measure cheat sheet a comprehensive reference tool. Familiarize yourself with symbols for electrical wiring, plumbing, or carpentry to fully utilize all the features your tape measure offers.
Real-World Applications of the 1/8 Inch Mark
Case Study: Building a Custom Bookshelf
Imagine you’re building a custom bookshelf that requires precise spacing and alignment of shelves. Using the 1/8 on a tape measure, you can ensure each shelf is evenly spaced and securely attached to the frame. By accurately measuring and marking the 1/8-inch increments, you prevent gaps and misalignments, resulting in a sturdy and visually appealing bookshelf.
Steps to Ensure Precision
- Measure and Mark: Start by measuring the height of each shelf using the 1/8-inch mark. Make precise pencil marks to guide your cuts.
- Cut Accurately: Use the 1/8-inch measurement to cut the wood pieces, ensuring consistency across all shelves.
- Assemble and Verify: Assemble the shelves, double-checking the 1/8-inch measurements to maintain alignment and stability.
This methodical approach ensures that your bookshelf is both functional and aesthetically pleasing.
Case Study: Sewing a Custom Dress
In sewing, precision is key to achieving a well-fitted garment. The 1/8 on a tape measure is used to measure seam allowances, hem lengths, and fabric cutting lines. Accurate measurements prevent fit issues and ensure that the dress drapes correctly on the body.
Ensuring Fit and Finish
- Measure Seam Allowances: Use the 1/8-inch mark to establish consistent seam allowances around the garment.
- Cut Fabric Precisely: Align the tape measure with the fabric edge and mark the 1/8-inch increments to guide your cuts.
- Verify Measurements: Double-check all measurements before sewing to ensure accuracy and prevent fitting issues.
By meticulously using the 1/8-inch measurement, you can create a custom dress that fits perfectly and looks professionally finished.
Case Study: Home Tile Installation
Installing tiles requires precise measurements to ensure even spacing and proper alignment. The 1/8 on a tape measure helps in marking grout lines and ensuring that each tile is placed accurately.
Steps for Accurate Tile Installation
- Measure and Mark: Use the 1/8-inch mark to establish grout lines, ensuring even spacing between tiles.
- Cut Tiles with Precision: Align your cuts with the 1/8-inch measurements to maintain consistency across all tiles.
- Verify Alignment: Regularly check your measurements as you install each tile, ensuring that the entire installation remains level and aligned.
This meticulous approach results in a professional-looking tile installation with uniform spacing and alignment.
Conclusion
Mastering the 1/8 on a tape measure is a fundamental skill that enhances precision and quality across a wide range of projects. From woodworking and sewing to home improvement and crafting, understanding and accurately applying this fractional measurement ensures that your work meets professional standards. By avoiding common mistakes, utilizing advanced techniques, and incorporating practical applications, you can elevate your craftsmanship and achieve flawless results in every endeavor. Embrace the precision of the 1/8-inch mark on your tape measure, and watch as your projects transform into expertly crafted masterpieces.